INSTALLATION DETAILS
OUR STEP BY STEP PROCESS

STEP 1 - PREPARATION
The quality of an epoxy floor is determined by the quality of the preparation. We start with diamond grinding the entire work area. This is done with top of the line vacuum equipment to maintain a safe working environment. Once grinding is completed the entire area is vacuumed. Next a thorough inspection is done to identify any areas that need repairs.
STEP 2 - FLOOR REPAIRS
It's common for concrete to have hairline crack, pitting, and voids. while this is ok for your old dusty garage, it wont be ok for your new statement piece. All of these flaws are identified during our inspection process and must be repaired. Any hairline cracks are ground out and then filled with polyurea filler or motar. Any cracks not repaired will appear in your new epoxy floor. After all repairs are completed the team will vacuum the entire space a second time.
STEP 3 - PIGMENTED BASE COAT APPLICATION
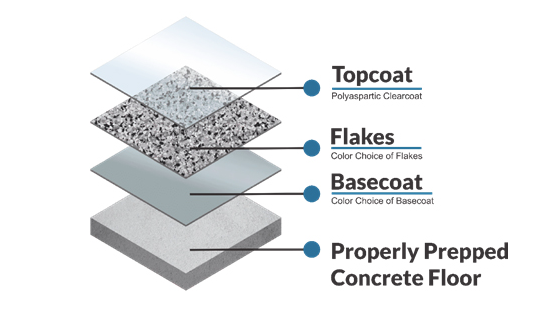
Each epoxy floor is comprised of a two part system our pigmented base coat and polyaspartic top coat. These two parts acting together is what creates the strength of our epoxy floors. Once the pigment is added to the base coat it is then poured over the entire work area. This base coat is the bonding agent between the concrete floor and the rest of the epoxy floor.
STEP 4 - DECORATIVE FLAKE DISTRIBUTION
The distribution of the flakes is done through rolling and broadcasting. This allows the flake to be spread in generous amounts while ensuring an even coat. 100% coverage of the work area is imperative for beautiful results which is why we are always spreading more flake than is needed. Once the entire area is covered it takes 60 minutes for the floor to cure. At this point the excess flake is removed and any standing flake is knocked down. The work area is then vacuumed a third time.
STEP 5 - TOP COAT APPLICATIONS
At this point it is now time for the top coat to be applied. Using a squeegee our team spreads the top coat over the entire work area. They then back roll the work area to create an even thick coat across the entire area. This process leaves a consistent durable finish. Our team member will advice wait times for use for your specific to your project upon completion.
General Wait Times
- 12 hours for light foot traffic
- 24 hours for daily use
- 48 hours before contents are put back in place
- 96 hours for vehicle usage
10-YEAR LIMITED WARRANTY
SWJ Epoxy offers a 10-year limited warranty for each project we complete. Each customer will receive a signed copy of the 10-year limited warranty at the date of purchase.

